Whether you’re at home or off the UW network, there are a number of resources available to remotely access your computer.
- Follow these instruction to Connect to Network Shared Drive
- Mac users can refer to Remotely Connect to Your Windows Computer
Network Connection Requirements
- Your work computer’s hostname and IP address – We recommend having both.
- VPN services: Husky OnNet or ADAI VPN (for ADAI/FADU employees only).
ADAI/ FADU users can skip to Launch Microsoft Remote Desktop. - Leave your work computer turned on.
Initiate Husky OnNet
- Locate and launch the application BIG-IP Edge Client
Windows: Click the Start button in the Windows taskbar, search for Big.
Macs: Open the Applications folder through the finder. - Click Big-IP Edge Client to open Husky OnNet.
- Click Connect, this will launch the VPN and secure a connection to the UW network.
- Log in with your UWNetID credentials
- A red circular f5 icon in the Windows taskbar indicates that you are securely connected.
- Continue with the next step.
Launch Microsoft Remote Desktop
Windows
- Click Start
- Type “remote”
- Click on Remote Desktop Connection
Create a Remote Desktop Connection
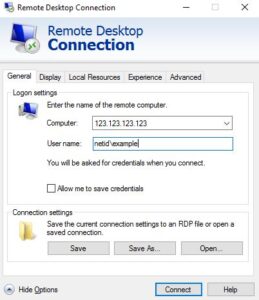
- Click Show Options
- Enter the computer name or IP address
- Enter your username as netid\yournetid (or adai\, wanprc\ instead of netid if you are on those domains)
- Leave the box unchecked next to “Allow me to save credentials”
- You can also configure your remote connection to use all of your monitors, your local webcam, microphone, printer, etc. using the following instructions.
Monitors
- Click the Display tab
- Check the box next to Use all my monitors for the remote session
Microphone
- Click on the Local Resources tab
- Click Settings beneath Remote Audio
- Select Record from this computer

- Click OK
Home Printer
To be able to print to your local printer while remotely connected to your work computer, check the box next to Printers on the Local Resources tab
Webcam
- Click More at the bottom of the Local Resources tab
- Check the box next to Video capture devices
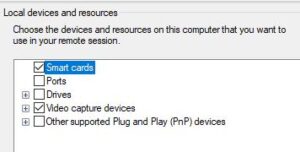
- Click OK.
- When you are done selecting the devices you wish to use, click on the General tab again. Click Save to save the connection or Save As to create an icon specifically for this connection you can use in the future (on your desktop or wherever you like)
- Click Connect
- If it asks you if you trust the connection, click Yes
- Type in your password
- Click OK and you will be logged into your computer