The following instruction may be followed when you know the IP address of the network printer. Often times the printer’s IP address will be displayed on the printer’s screen or be labeled on the printer. We can certainly install a printer for you – please contact us.
-
- Click Start (or press the Windows Key + R on your keyboard and skip to step 3)
- Type “run” and press enter
- Type “control printers” and press enter
- Click Add a printer near the top of the window
-
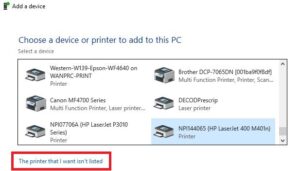
- Click The printer that I want isn’t listed at the bottom of the window
-
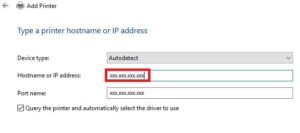
- Select Add a printer using TCP/IP address or hostname
- Click Next
- Fill in the Hostname or IP address field with the printer’s IP address, which will automatically fill in the Port name field as well
- Ensure the box is checked next to Query the printer and automatically select the driver to use
- Click Next
- You may be presented with one of two windows:
– If a window pops up asking Which version of the driver do you want to use? select Replace the current driver
– If a window pops us asking you to select a driver, try to locate the appropriate selection based on the make and model of the printer – please contact us for assistance if you are unable to find the appropriate selection or are unsure which to choose - Click Next
- For the Printer name, input a name relevant to the location and the printer type, for example, HSB-170 Ricoh, or B170 HP Laserjet
- Click Next
- Select Do not share this printer
- Click Next
- Click Print a test page to verify the printer is working (unless you are using a Ricoh with a job code, in which case click Finish and follow these instructions: Storing a Job Code for a Printer)
- Click Finish
- Your printer will now appear in the Devices and Printers screen you began at – if you’d like the newly-installed printer to be your default printer, right-click and click Set as default printer.


