knowledgebase article related to computer or laptop setup
Adjust Microphone Levels
When a microphone is either too loud or too quiet, try adjusting the sound levels.
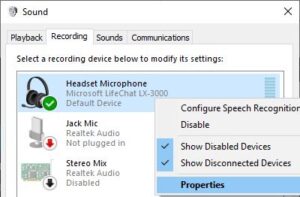
Right-click the sound icon in the Windows system tray
Click Sounds
Click on the Recording tab
Right-click your microphone
Click Properties
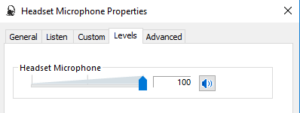
Click the Levels tab
Adjust the slider to the desired output volume
Click OK, then OK again, to close out the Sound menu
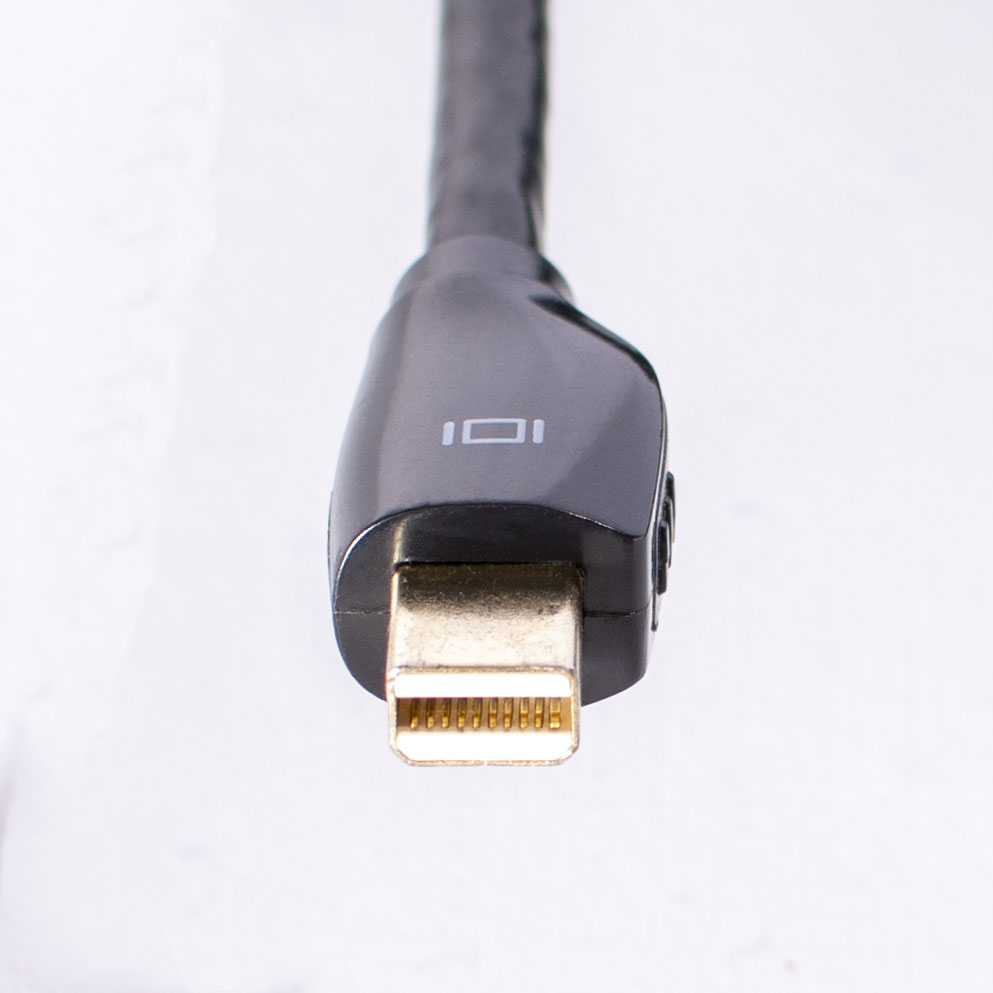
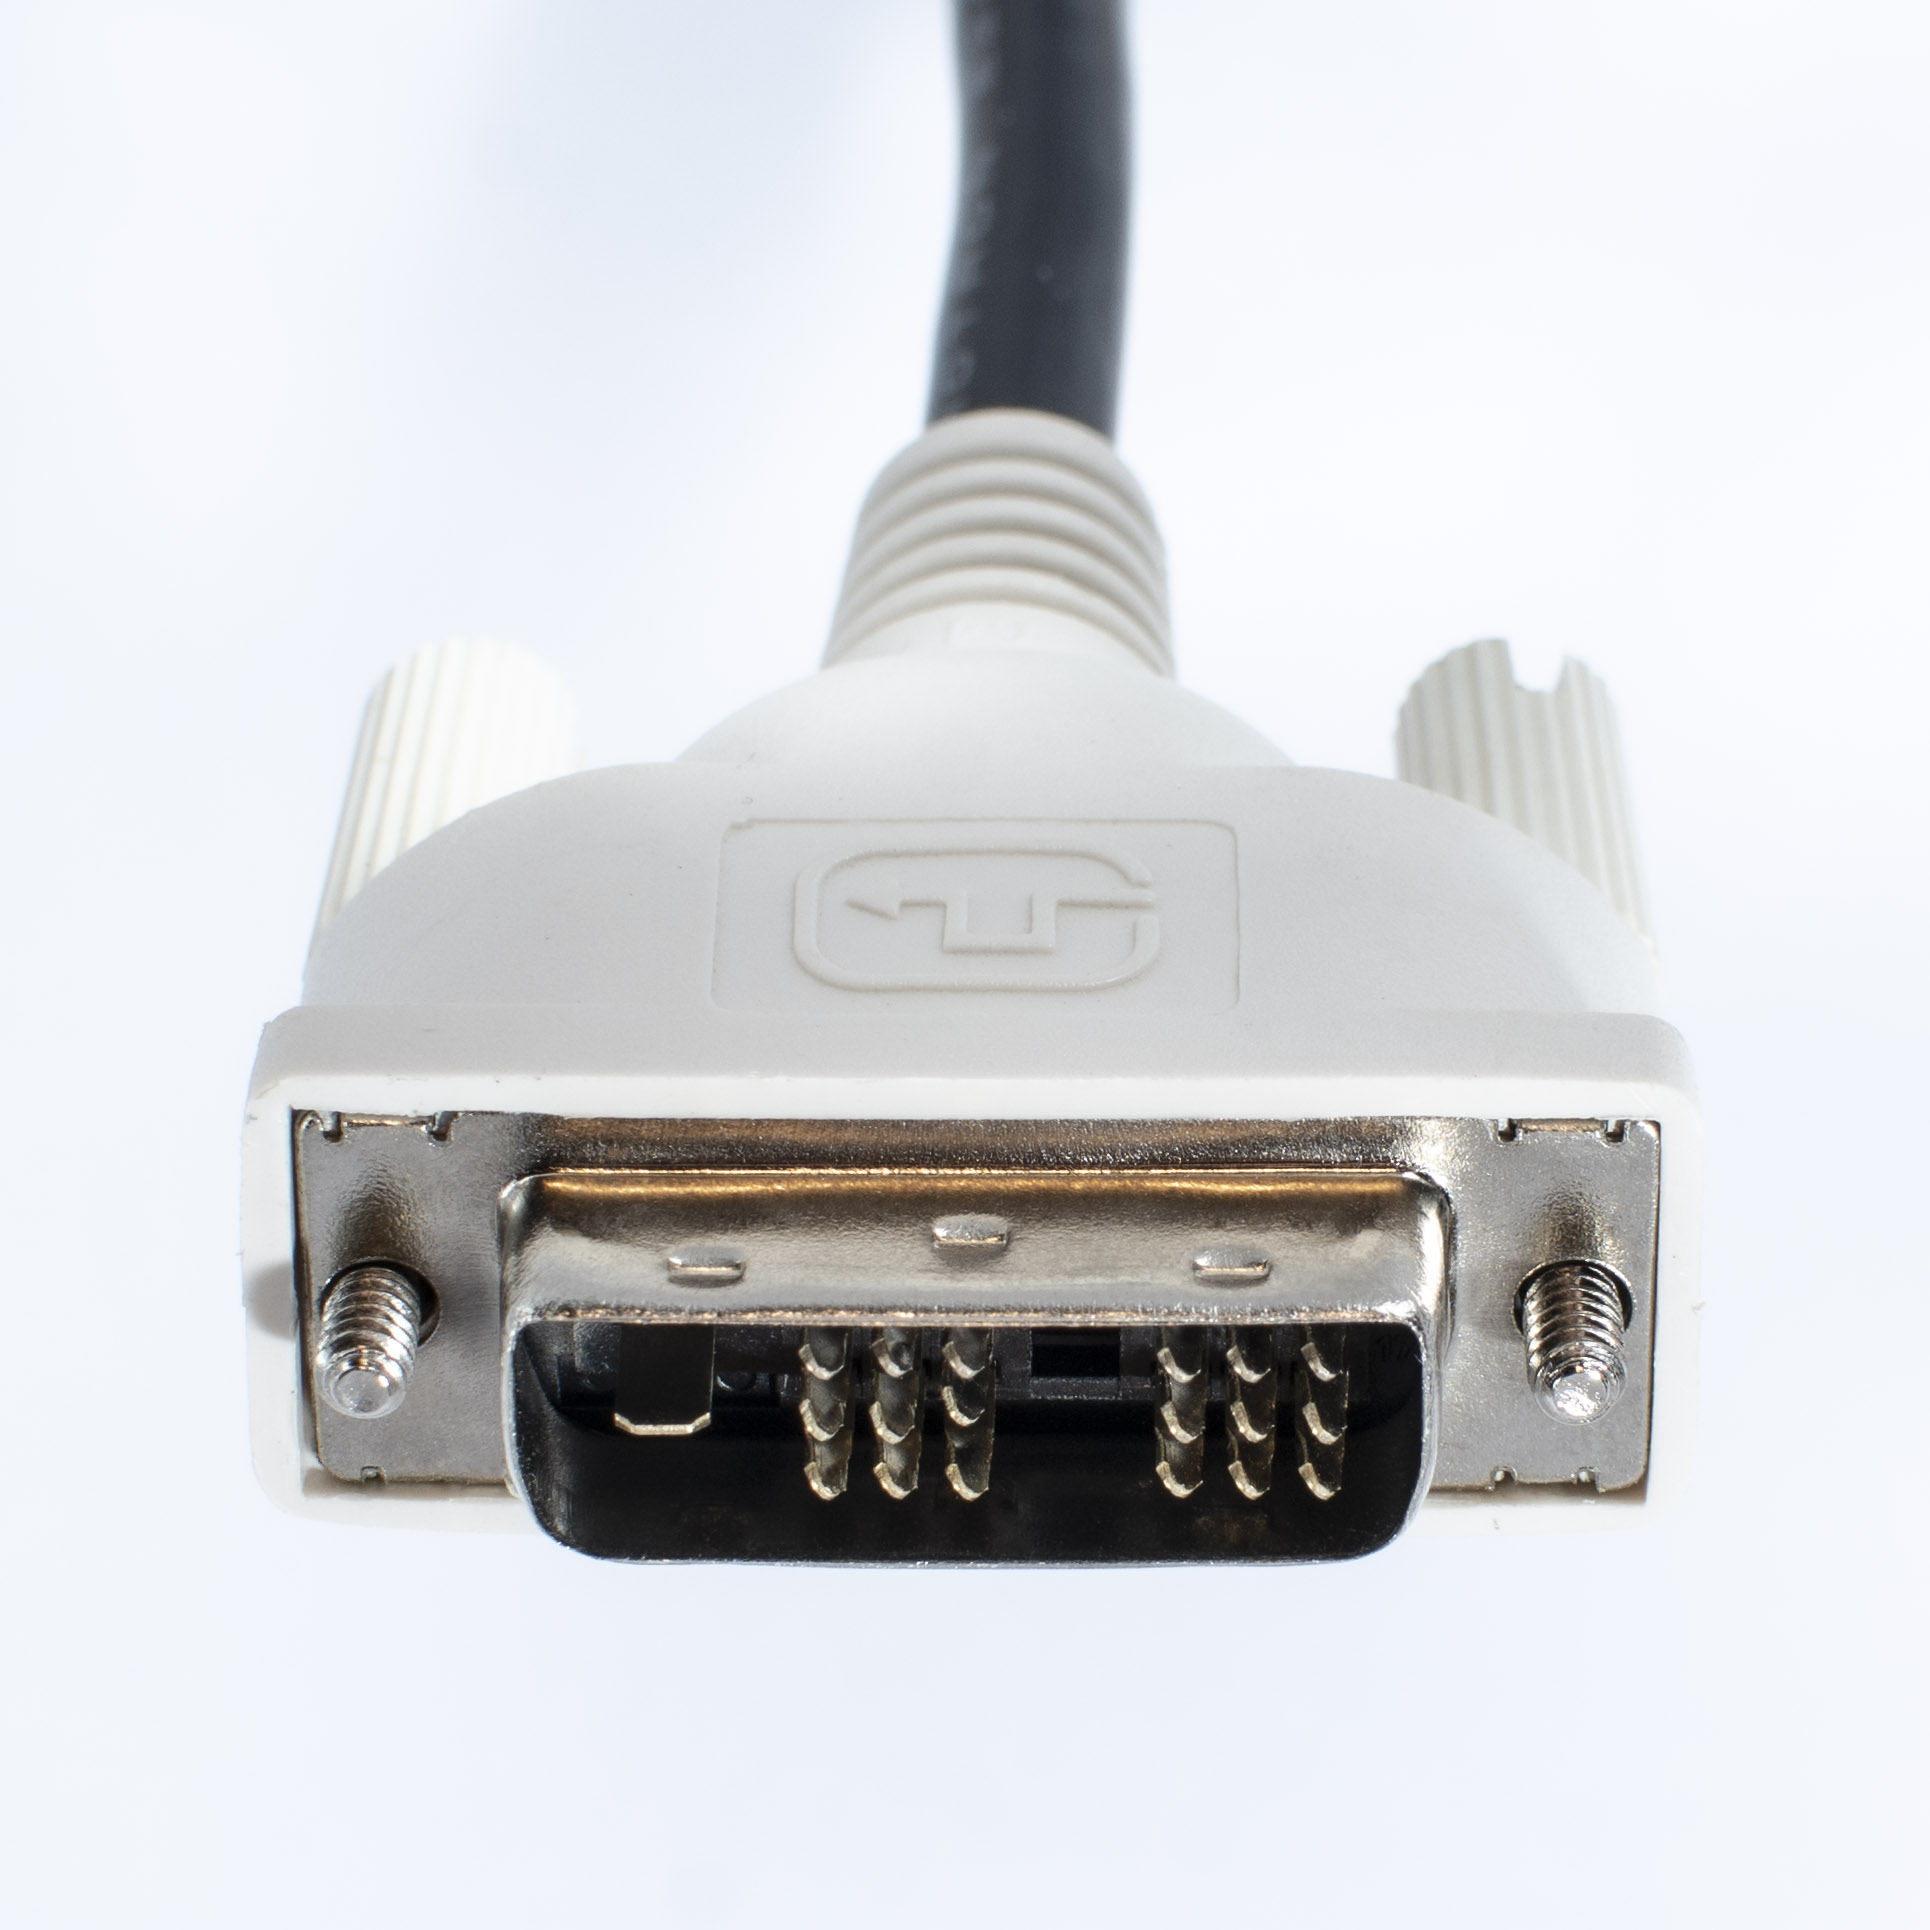
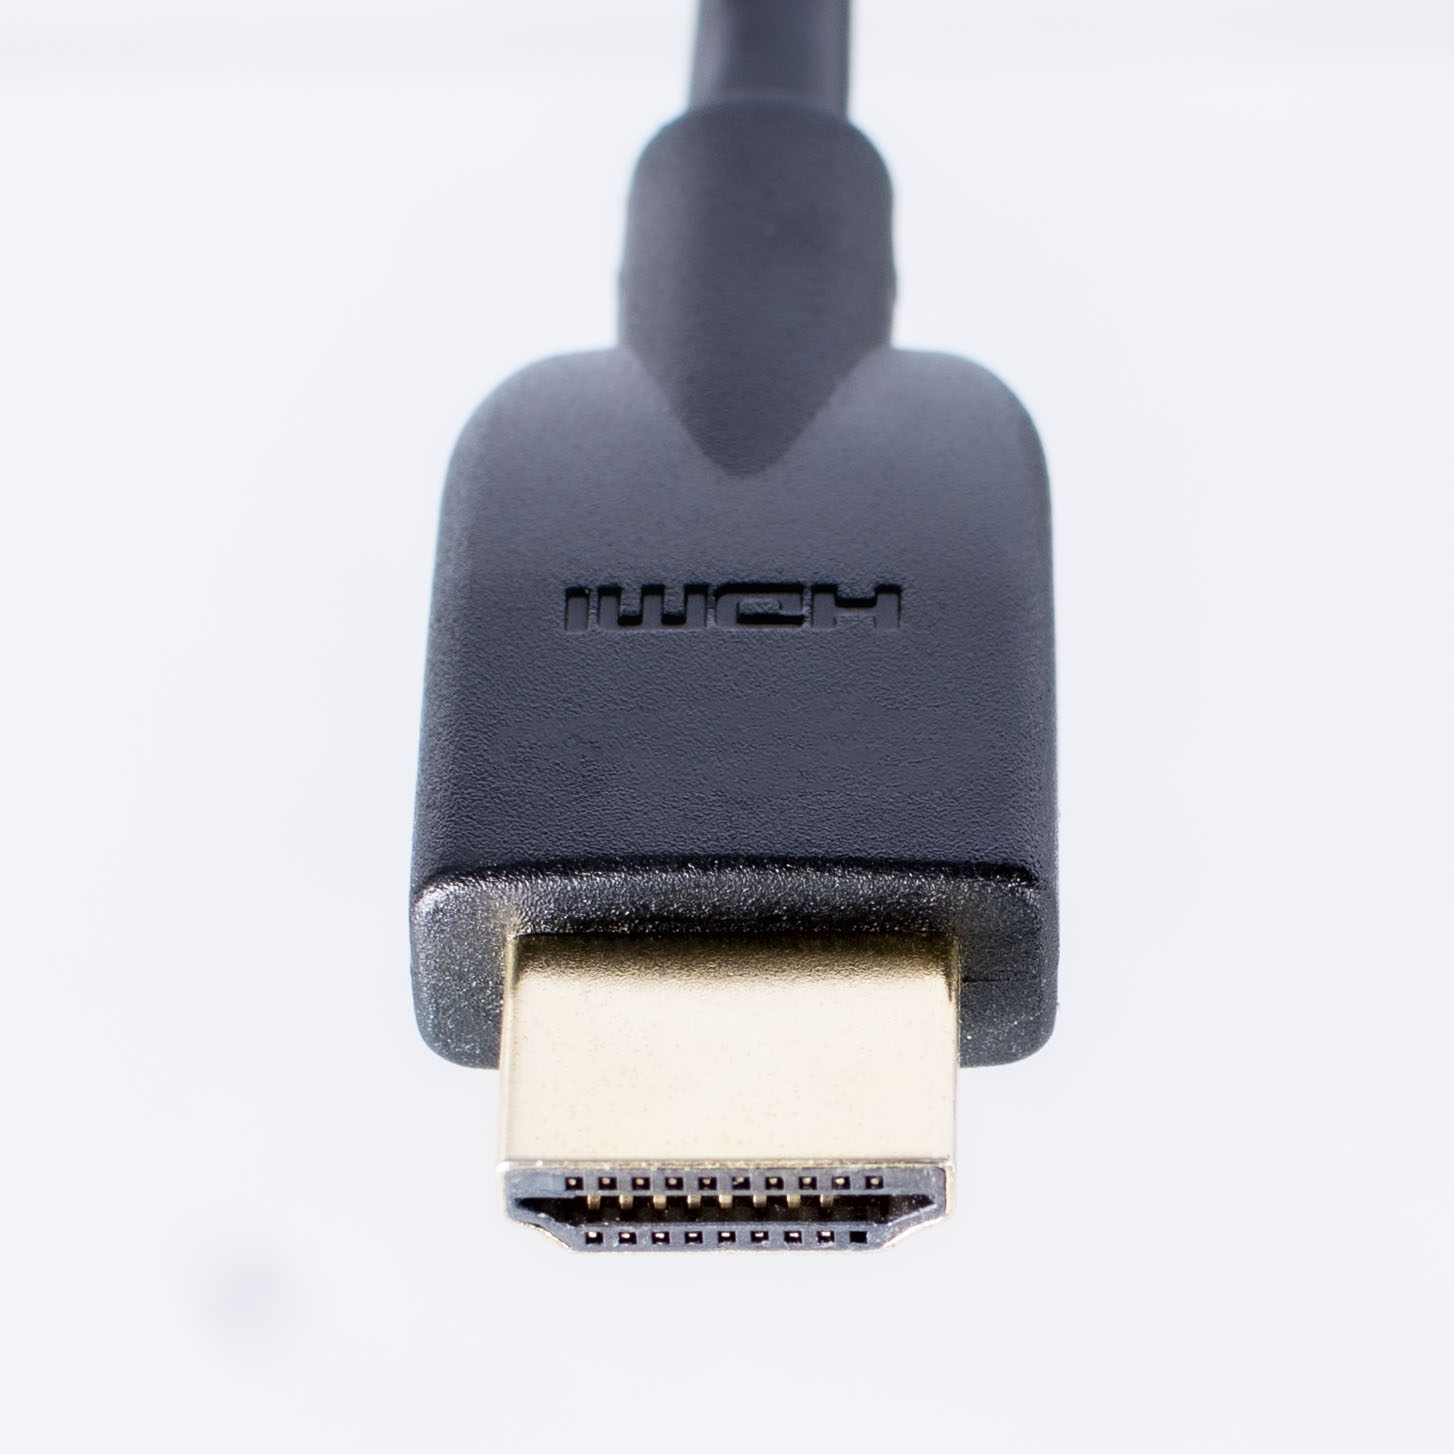
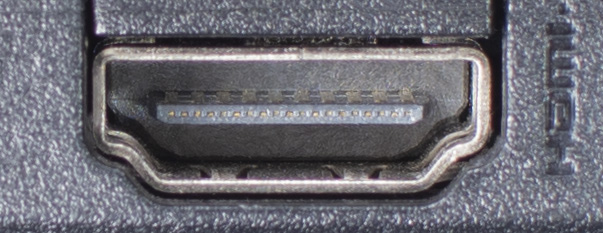
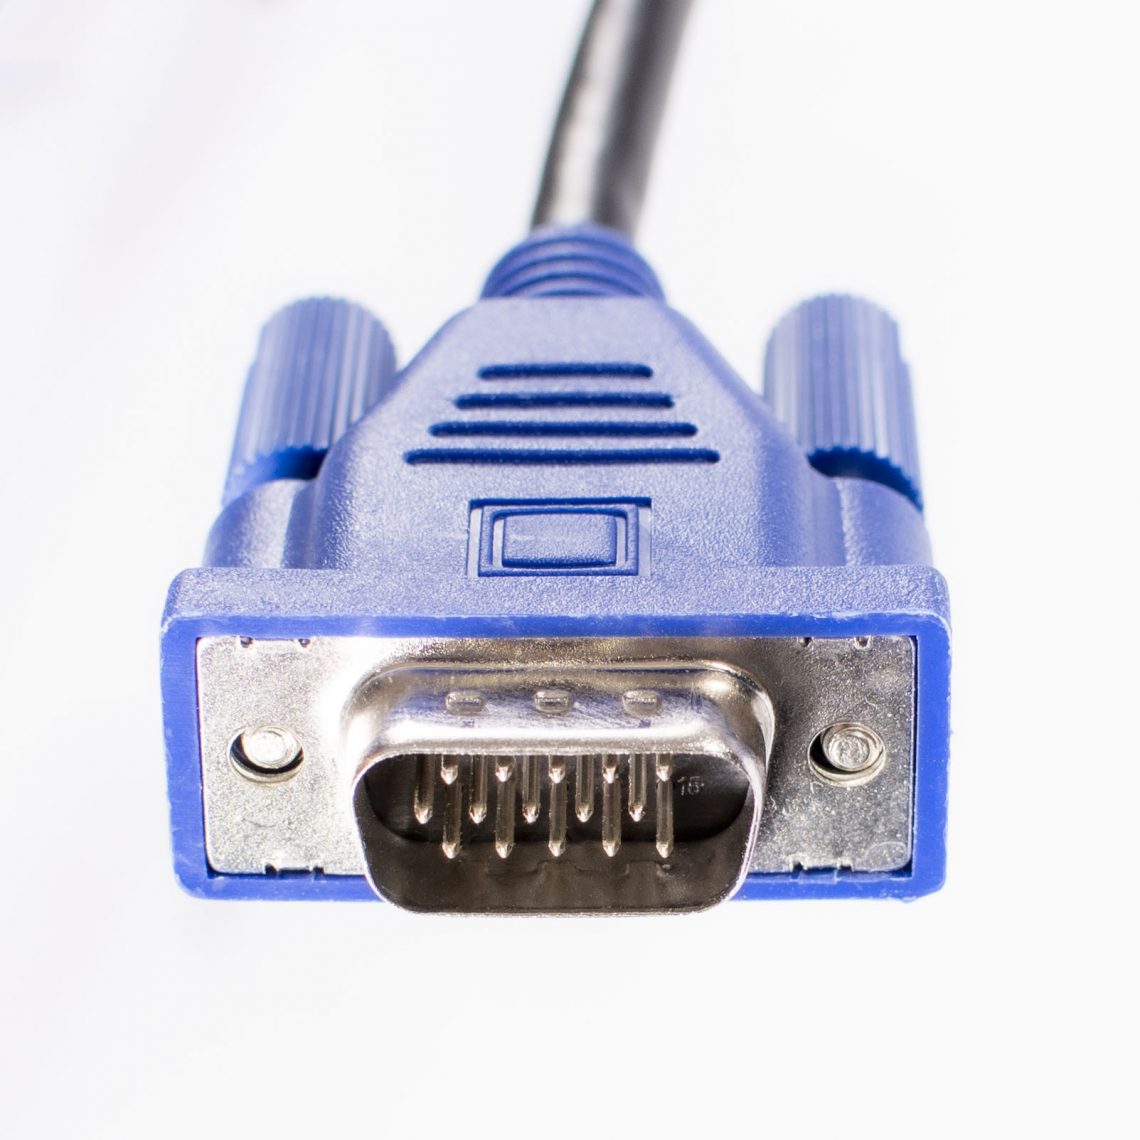
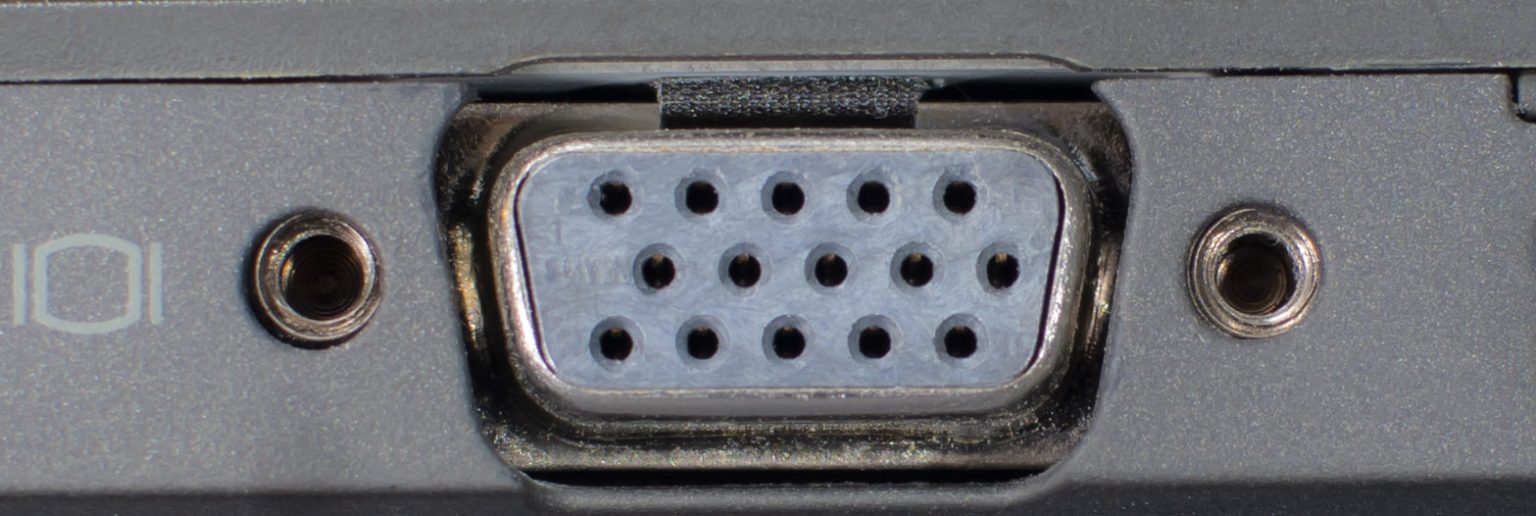
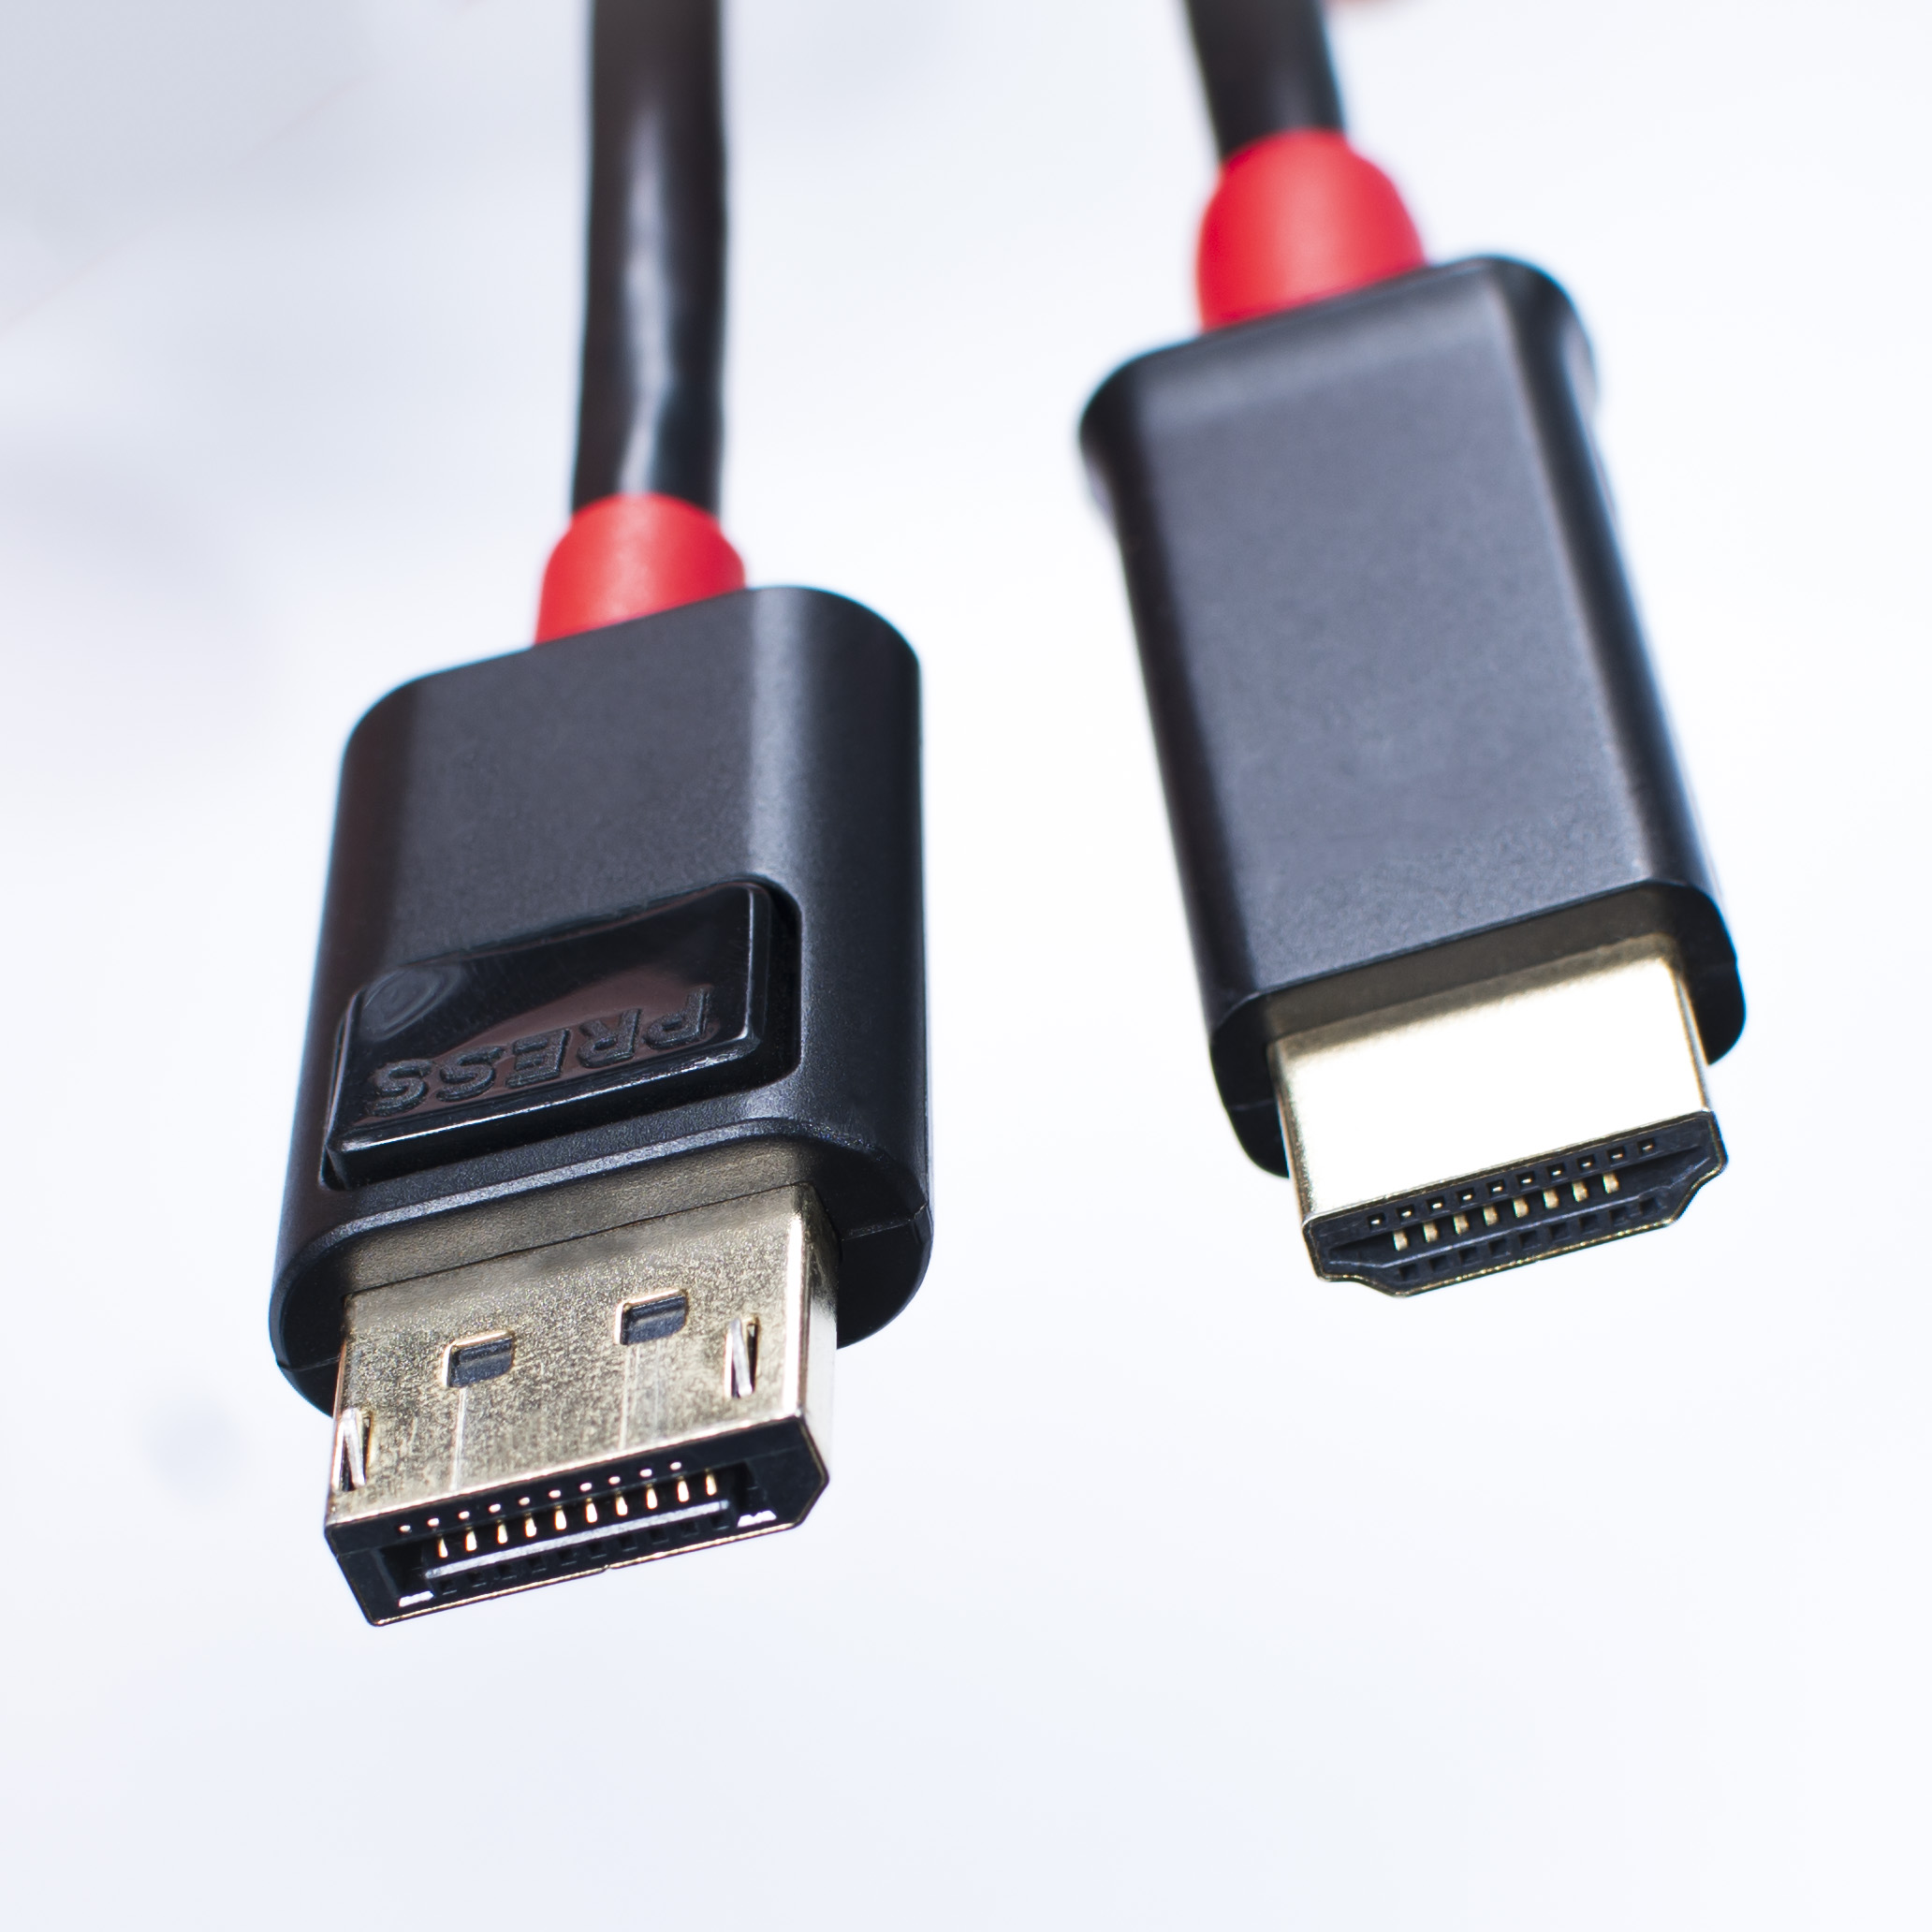
Visual Guide to Monitor Connections
Types of Monitor Cables
cables
Cable
Input
Cable
Input
Cable
Input
Cable
Input
Cable
Input
Cable
Input
Converting Video Connections
There are a variety of options for converting video connection types between devices that require specific adapters.
adapters
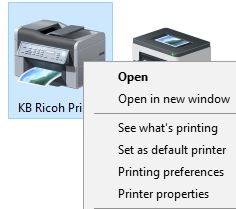
Store a Job Code for a Printer
Save time by saving the Job Code in your printer preferences.
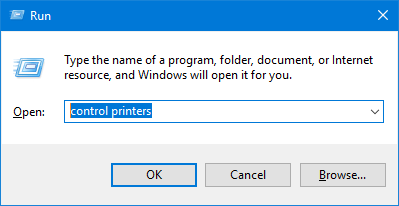
Click Start – or press the Windows Key + R on your keyboard and skip to Step 3.
Type “run” and press enter
Type “control printers” and press enter
Right click the printer you would like to store the code for
Click Printing Preferences
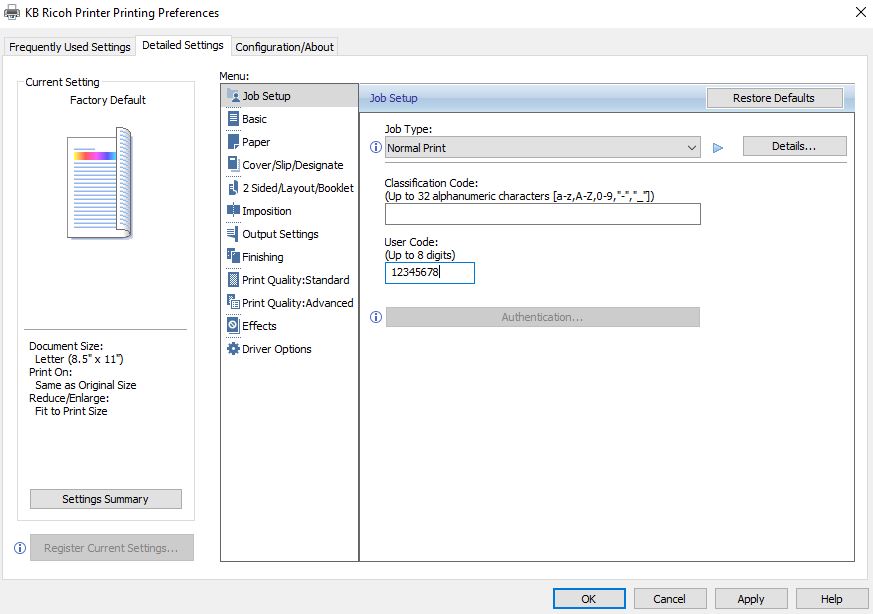
Click Detailed Settings
Click Job Setup
Enter the job code in the User Code field
Click OK
Add a Network Printer
The following instruction may be followed when you know the IP address of the network printer. Often times the printer’s IP address will be displayed on the printer’s screen or be labeled on the printer. We can certainly install a printer for you – please contact us.
Click Start (or press the Windows Key + R on your keyboard and skip to step 3)
Type “run” and press enter
Type “control printers” and press enter
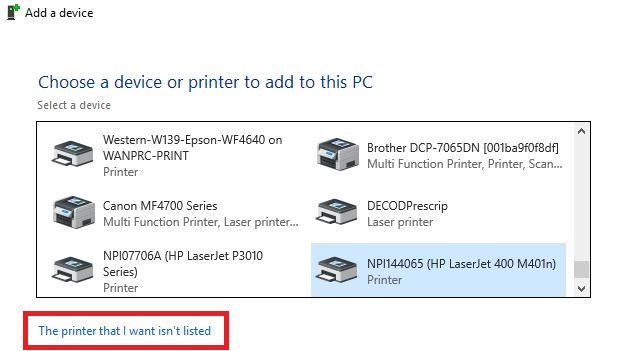
Click Add a printer near the top of the window
Click The printer that I want isn’t listed at the bottom of the window
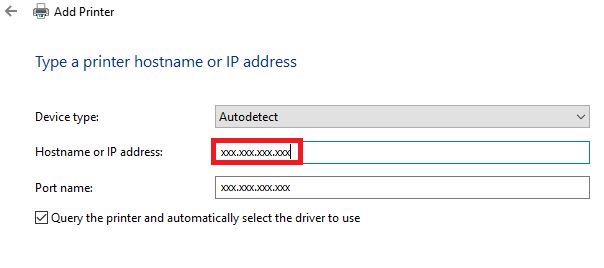
Select Add a printer using TCP/IP address or hostname
Click Next
Fill in the Hostname orIP address field with the printer’s IP address, which will automatically fill in the Port name field as well
Ensure the box is checked next to Query the printer and automatically select the driver to use
Click Next
You may be presented with one of two windows:
– If a window pops up asking Which version of the driver do you want to use? select Replace the current driver
– If a window pops us asking you to select a driver, try to locate the appropriate selection based on the make and model of the printer – please contact us for assistance if you are unable to find the appropriate selection or are unsure which to choose
Click Next
For the Printer name, input a name relevant to the location and the printer type, for example, HSB-170 Ricoh, or B170 HP Laserjet
Click Next
Select Do not share this printer
Click Next
Click Print a test page to verify the printer is working (unless you are using a Ricoh with a job code, in which case click Finish and follow these instructions: Storing a Job Code for a Printer)
Click Finish
Your printer will now appear in the Devices and Printers screen you began at – if you’d like the newly-installed printer to be your default printer, right-click and click Set as default printer.
Find Computer Name, IP, MAC Address
Your computer’s Hostname and IP address are useful pieces of information to have. You may need them to remote into your computer and the ASA-IS team may need it to remote in when supporting you remotely.
Note: There may be a sticker on your device with your computer’s name (examples: OTO-12345, HSAS-12345, BIME-12345).
Networks.uw.edu – IP and MAC Address
The easiest way to find your IP address is in the Network Portal [requires UWNetID].
It’s a good idea to bookmark this site so you can come back to it easily.
You can also find your MAC address here which is useful for certain scenarios such as registering a device on the UW wireless manually if it can’t connect.
Command Prompt – IP address and Computer Name
Click the Start button
Type “cmd”
Click the Command Prompt option that appear – a block box will come up with a blinking white cursor
type in ipconfig and press enter
Your IP address is on the IPV4 Address line, in the format xxx.xxx.xxx.xxx
To get your computer name, type in hostname and press enter – the name will be given on the next line
Connect to a Network Shared Drive
Use these instructions to connect to your departmental network shared folders. Note: If you are connecting from off the UW network or from a different UW domain, please first connect via the Husky OnNet
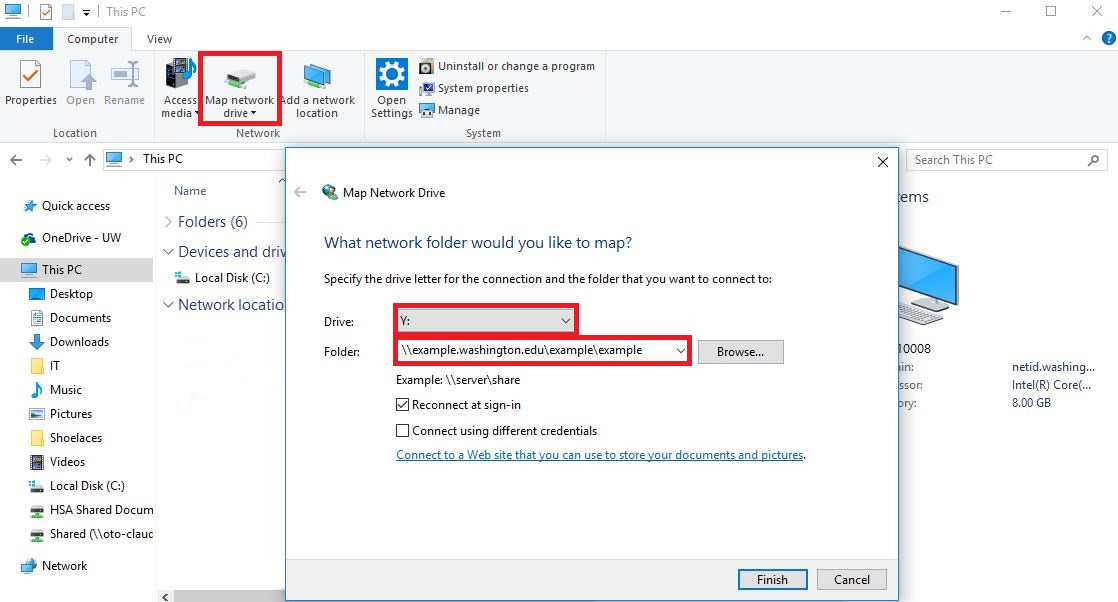
Windows 10
Right-click the Start button located in the lower-left-hand corner of the screen
Click on File Explorer
In the navigation pane of File Explorer, click This PC
Under the Computer tab, click Map Network Drive
Choose a drive letter – this is a placeholder but if your department has standardized which letter to use (“Open the P drive,” for example – a list of folders is presented) then assign that letter
Paste in or type the address of the network share you are trying to access
If you are connecting from off the UW network or a different domain than the share you are connecting to, please jump to Connecting With UW Credentials
Click Finish.
Windows 7
Map a network drive to get to it from Computer or Windows Explorer without having to look for it or type its network address each time.
Click the Start button
Click Computer
Click Map Network Drive in the toolbar at the top of the window
Choose a drive letter – this is a placeholder but if your department has standardized which letter to use
(“Open the P drive,” for example – a list of folders is presented) then assign that letter
Paste in or type the address of the network share you are trying to access
If you are connecting from off the UW network or a different domain than the share you are connecting to, please jump to Connecting With UW Credentials
Click Finish
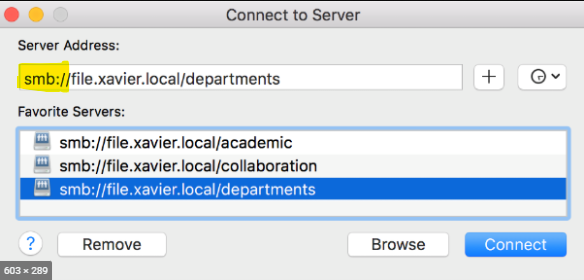
Mac
If you are not on campus, connect to the VPN, Husky OnNet (BIG-IP Edge client)
On the Mac keyboard, press the Command key + k. This will bring up Connect to Server window.
Type in smb:// before the file path, – for example: smb://**enter_your_filepath_here**
Click the + button, located at the bottom left of the window. This will add it to the Favorites in the Connect to Server window.
Click Connect and enter your UW NetID credentials, if prompted.
Permanently Mount the Drive After a Restart
Open ‘System Preferences‘ from the Apple menu. It is located at the top left of the desktop, click the Apple icon.
Click, ‘Users & Groups‘
Click ‘Login Items‘ at the top-center of the ‘Users & Groups’ window.
Click the ‘+‘ symbol, located directly at the bottom-center of the window.
Click the shared drive that you just mounted.
Now select the directory you want to mount permanently.
Exit out of System Preferences.
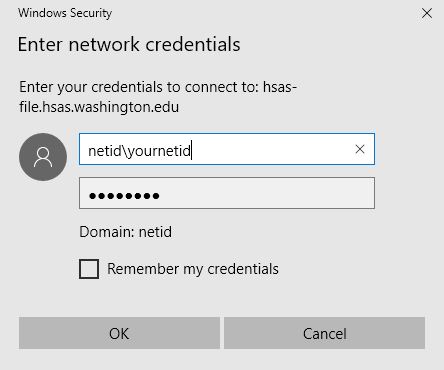
Connect with UW Credentials
Use these instructions if you are connecting from off of the UW network or to a different UW domain. Note: If you have added your drive previously but it shows as disconnected, check your connection to the VPN and then try opening the drive again.
Windows 7/10
Make sure the box next to Connect using different credentials is checked
Click Finish
You will be prompted for your username and password – put in your username as
netid\youruwnetid or the domain you are connecting to, for example, adai\adaiusername or wanprc\wanprcusername
Input the corresponding password
Click OK.
Manually Install Windows Updates
If you are using a UW-owned mobile device supported by ASA-IS to work from home, please follow the instructions below to process Windows updates.
Connect to Husky On Net or ADAI VPN
Before you can connect to our servers to run the updates, you must first connect to Husky OnNet VPN or, if you are an ADAI employee, the ADAI VPN.
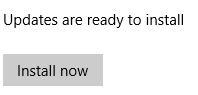
Click on the gray button “Check for updates” Note: do not click on the “Check online for updates from Microsoft Update” button. Those updates are not vetted by ASA-IS yet and may cause issues with your system. [ Screenshot ]
You will receive one of two messages – that your computer is up to date or provided a list of updates to download. You may have to click an “Install now” button to install the updates. [ Screenshot ]
Once updates are installed, you may be prompted to restart your computer to finish installing updates. [ Screenshot ]
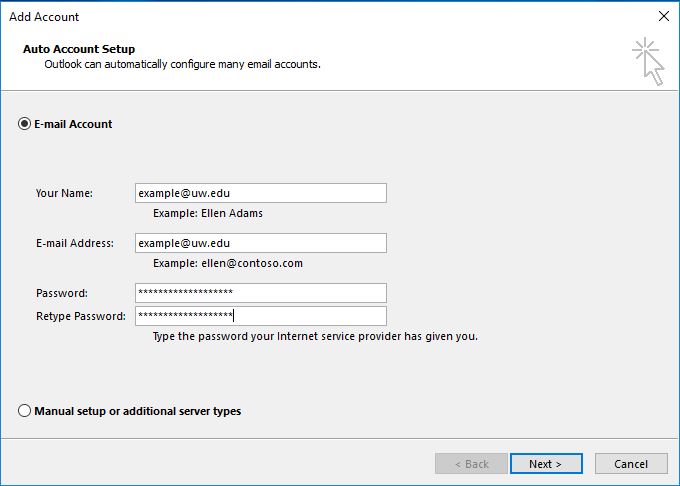
Initial Outlook Setup (Win 10)
When you log in to a computer for the first time, you’ll need to set up your email on Outlook. Thankfully it only takes a minute!
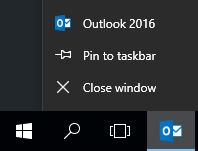
Click the Start button in the lower left-hand corner of your screen
Type “Outlook”
Click on “Outlook 2016″
Optional: An Outlook icon will appear on your taskbar – to pin it there, right-click on the icon and select Pin to taskbar
If you are on the UW NetID domain, Outlook will automatically grab your name and email. Otherwise, type in your name, your email, and your password and click Next
Outlook will then connect to the account, at which point a Windows Security window will pop up asking for your credentials – input your UW NetID password and click OK
If successful, you will receive the message “Congratulations! Your email account was successfully configured and is ready to use” – click Finish
It will take a couple of minutes or longer depending on the size of your email account to download your emails.
Troubleshooting
Double-check your password – you can try logging into MyUW to make sure your NetID and password are working. If you cannot log into MyUW, try resetting your password or calling UW IT at 206-221-5000 for password assistance.
Make sure you are putting your full @uw.edu email address.
In the event that Outlook is set up but are not receiving any emails, follow the steps to Change UW Email Forwarding to make sure your email is forwarded correctly.
Install Office365 Using Your UWNetID
Working at the University of Washington has its perks and one of them is being able to install Office365. This allows you to install the application onto your personal computer and have access to all Office apps such as Word, Excel, PowerPoint, and OneDrive which includes 1TB of cloud storage.
Alternatively, Office365 is available for online use via a web browser. Log in with your UWNetID credentials to the Outlook on the Web (OWA). Click on the App Launcher icon (9-point grid) in the main menu to view the Office Apps available on the web.
Online Security
Anyone who uses OWA on a public computer must be sure to sign out completely from the OWA site, close the browser, and sign out of the computer, to secure your account.


