Skip to content

OneDrive: External Sharing Options

External Sharing Disabled
Per UW IT’s website:
“External Sharing is disabled on UW OneDrive for Business accounts, which means you will not be able to share files outside of the UW, i.e. with individuals with a non-UW email address.”

Resources for External Sharing

Other resources can be created that allow teams, rather than individual accounts, share documents outside of the UW. UW IT provides Collaboration Services, but the following is a quick overview:

SharePoint Online

  • Create a customizable website
  • Automate processes and workflow
  • Store and collaborate on files
  • The default SharePoint Online site storage limit is now 25TB

Learn more about SharePoint Online.

SharePoint Online Modern Communication

  • Publishing site
  • Mobile support
  • Deliver content to a wide audience

Learn more about SharePoint Online Modern Communication.

Microsoft Teams

  • Chat and video conference with your team
  • Share and work on files collaboratively, accessible through the chat interface
  • Customizable – can add web sites and apps such as Planner.

Learn more about Microsoft Teams.

Office 365 Groups

  • Shared Outlook inbox, shared calendar
  • Can be integrated with a Microsoft Team

Learn more about Office 365 Groups.

Click here to request one of these resources from UW IT – ensure you put “Allow external users who accept sharing invitations and sign-in as authenticated users” or “Allow sharing with all external users by using anonymous access links” in the Notes field.

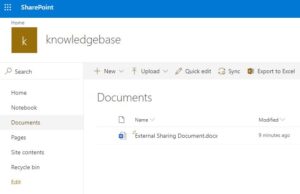
Example of Sharepoint Online document libray

All four of the options will come with a document library. The document library’s interface is the same as an individual OneDrive account’s interface but will be integrated into the four resources in different ways.

SharePoint Doc Library

You can share files with external users, who will receive an email with a link to the document. You can also give membership to UW employees – for them, clicking Sync from the library will sync files to their local OneDrive.
ASA-IS OneDrive Resources

OneDrive: Collaboration

OneDrive allows multiple people to work on Office files at the same time. There are multiple ways to collaborate, using the web portal, the desktop application, or both.

OneDrive Collaboration

OneDrive on the Web

Working on documents through the web portal is seamless, showing where other cursors are in real-time and updating edits with minimal lag time. Simply open up the document in your browser through the web portal – when another person opens the same file, you will be collaborating.

Chat

If multiple people open a file in their browser through the web, they will have the option to chat. Simply click on the red-colored “C” icon in the main menu next to the Share and Comments buttons. [ Screenshot ]

Go to location will indicate where they are working in the document or click Join group chat to send a message. When you send a message, the recipient will receive a notification: [ Screenshot ]

They can then click respond to begin chatting. [ Screenshot ]

Desktop Application – depends which version

Two people who have a file synced to their local OneDrive application can open the document locally and still be editing the document in real-time together. The functionality that is available depends on which version of Office you have installed.

Office 365

If you have Office 365 Pro Plus installed on your computer, you have access to chat with other collaborators on the desktop application. The functionality is very similar to the online version of Office used through the web portal.

Office 2016 and earlier

Chat is not available in earlier versions of Office.

When collaborating with the desktop application, the program will lock sections for editing, save the changes, then sync the saved changes with the cloud, which then updates for everyone else. There can be some lag time in seeing updates. [ Screenshot ]

Office 2016 will indicate who else is working on the document, share the document, and set permissions by clicking the Share button in the upper right-hand corner of the screen: [ Screenshot ]

Web and Desktop Application

Two or more people can open up the same document through the web portal and through their local Office applications at the same time.

Chat only works for online Office apps or local Office 365 applications.
Comments work in all versions.

[ Screenshot ]

[ Screenshot ]

ASA-IS OneDrive Resources

OneDrive: File Status & Sync Settings

File Status

OneDrive files are stored either in the cloud and on your computer or solely on the cloud and downloaded on an as-needed basis (refer to Files on Demand)

The following figures indicate the status of the documents in your local OneDrive:
[ Screenshot ]

[ Screenshot ]

OneDrive Sync iconSyncing – This icon indicates that the file or folder is syncing or sync is pending.

Consult Microsoft’s documentation for a complete list of potential OneDrive status icons.

Change Sync Settings

Individual files

Change to Always keep on this device to always be a local copy of a file stored.
[ Screenshot ]

Manage Folders

You can also choose which folders are synced to your local OneDrive. Click the cloud icon and then Settings. [ Screenshot ]

Next to the account you’d like to manage the synced folders for, click Choose folders.

You can then uncheck the boxes next to folders you do not want to sync, then click OK to apply.

Files On-Demand

Files On-Demand will show you all the files available to you through OneDrive but only download files on demand, or when you go to open them. This saves disk space but may be slower and does not keep a local copy of all of your files.

If you would like to manage Files On-Demand:

  1. Click the cloud icon in your system tray
  2. Click More
  3. Click Settings
  4. Click the Settings tab
  5. Check (enable) or uncheck (disable) the box next to Save space and download files as you use them

ASA-IS OneDrive Resources

OneDrive Overview
Sign-in and Setup
Share and Sync Files
Collaboration
External Sharing Options

OneDrive: Share & Sync Files

There are two ways to share files with others: from your computer or from the web portal.

Share from Your Computer

  1. Right-click the folder or file you’d like to share
  2. Click Share [ Screenshot ]
  3. Enter the UW email of the person you’d like to share with [ Screenshot ]
  4. Click Send

Share from the Web

  1. Log in to OneDrive on the Web
  2. Select the file or folder you’d like to share [ Screenshot ]
  3. Click the Share button in the main menu
  4. Enter the UW email address of the person you’d like to share with [ Screenshot ]
  5. Click Send

Sync Files

In order to sync files to your computer:

  1. Log in to OneDrive on the Web
  2. Click on Shared in the sidebar menu [ Screenshot ]
  3. Open the folder that contains the files you’d like to sync to your local computer
  4. Click the Sync button in the main menu
  5. Depending on your browser, you’ll receive one of the following messages. Click to Open
    [ Screenshot ] [ Screenshot ]
  6. When you go to This PC the synced folder will be available in the UW in the sidebar [ Screenshot ]

ASA-IS OneDrive Resources

OneDrive Overview
Sign-in and Setup
File Status and Sync Settings
Collaboration
External Sharing Options

OneDrive: Sign-in and Setup

OneDrive Desktop Application

  1. Click the OneDrive icon (the gray cloud) in your system tray next to the time and and date. If it is not visible, click the ^ to reveal more icons. [ Screenshot ]
  2. Click Sign in [ Screenshot ]
  3. On the Set up OneDrive screen, enter your UW email address (netid@uw.edu) and click Sign in [ Screenshot ]
  4. When the UW NetID login page comes up, enter your NetID and password and click Sign in
  5. A OneDrive window will come up that explains where your OneDrive folder is located on the computer – if you’d like to, you can click Change location to set the location to somewhere else
  6. Click Next
  7. A set of brief tutorial slides will appear, click the arrow to continue through these slides
  8. At the end, click Open my OneDrive folder
  9. To go back to your OneDrive folder, click the yellow folder icon at the bottom of your screen and OneDrive-UW will be on the left-hand pane of that window [ Screenshot ]

OneDrive On the Web

  1. Go to OneDrive
  2. Enter your UW email address
  3. Press Enter or click Next
  4. Log in with your NetID credentials

ASA-IS OneDrive Resources

OneDrive: Overview

OneDrive for Business is a service provided to the University through UW IT. The IT Connect website has information regarding the UW’s implementation of OneDrive for Business.

ASA-IS provides OneDrive Resources as guides to setting up OneDrive and using its various functions, including sharing and collaborating on documents.

Eligibility

When Users Leave the UW

  • Current student, faculty, or staff accounts are disabled and the files are automatically deleted.
  • Faculty and staff accounts are disabled after 14 days.
  • Student accounts are disabled after one academic quarter.
  • Emeritus faculty accounts remain enabled.

Store and Share Files

  • Store up to 5TB of data in the cloud
  • 250GB maximum file size
  • Store HIPAA and FERPA protected data
  • Share files with UW users with a UW NetID

External Sharing Disabled

For more information about external sharing and options that will allow you to share with external users, refer to External sharing options.

ASA-IS OneDrive Resources

Install Office365 Using Your UWNetID

Working at the University of Washington has its perks and one of them is being able to install Office365. This allows you to install the application onto your personal computer and have access to all Office apps such as Word, Excel, PowerPoint, and OneDrive which includes 1TB of cloud storage.

Alternatively, Office365 is available for online use via a web browser. Log in with your UWNetID credentials to the Outlook on the Web (OWA). Click on the App Launcher icon (9-point grid) in the main menu to view the Office Apps available on the web.

Online Security
Anyone who uses OWA on a public computer must be sure to sign out completely from the OWA site, close the browser, and sign out of the computer, to secure your account.

How to install Office365

To install Office365 please follow these steps:

  1. Navigate to Outlook on the Web (OWA)
  2. At the top left of the page, click Located at top left of page, then click Office 365 ->on the right
  3. On the new page there is a link labeled, Install Office ˅ -click and a drop down appears
    • Click Office 365 apps
    • Clicking Other install options will display your account settings
  4. For now, click Office 365 apps to begin
  5. The download will commence and a window will open showing you the location of where it will be downloaded
  6. Click OK
  7. Depending on your browser, you may see the completed download at the bottom of the browser
    • Once downloaded, proceed to click the download to execute the install or go to the location of the download
  8. The install is automatic and will finish shortly