- Click on the sound icon in the system tray in the lower right-hand corner of your screen

- Click on the slider bar to adjust volume
- If that does not work, try restarting your computer and if still not working, continue on
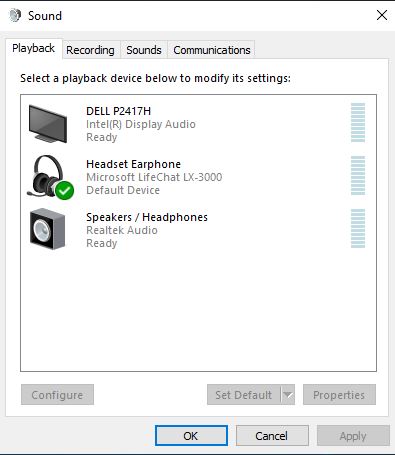
- Right click on the sound icon
- Click Sounds
- Click on the Playback tab
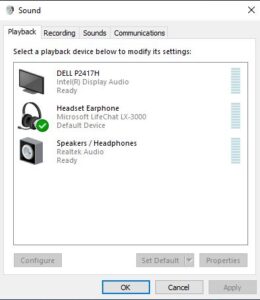
- Right click in the white space and ensure Show Disabled Devices is checked
- Right click on the speakers you would like to use (which may have been disabled) – if you do not know which to use, try a different speaker than the one with the green check mark
- If the device was disabled, click Enable Device first then right click on it again
- Click Set as default device
- Click OK to close the Sound window
- Try adjusting the volume as in step #1 – if you hear a dinging noise, the speakers are working properly.
Category: Troubleshooting
knowledgebase article related to troubleshooting common problems
Shared Email Not Updating/Disconnected
In the event a shared email account is no longer receiving new emails, remove and re-add the account to Outlook to resolve the issue.
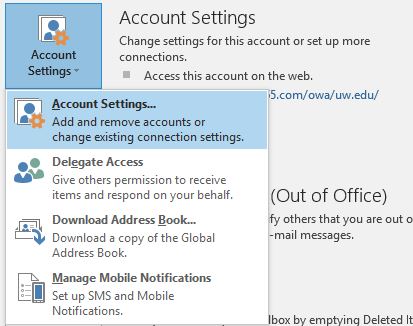
- From within Outlook, click on File in the main menu
- Click on Account Settings, then Account Settings again [ Screenshot ]
- Select the shared email address and click Remove
- Click Yes if prompted whether you want to continue
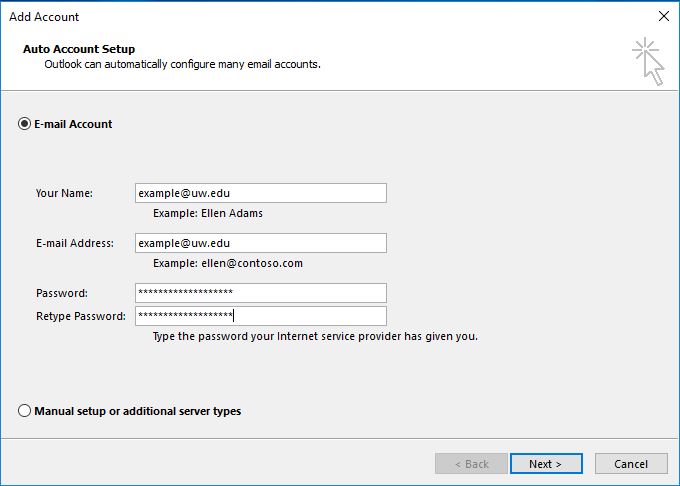
- Once the account has been removed, click New [ Screenshot ]
- In the Name field, put the Shared NetID
- In the Email field, put in the shared email address
- Type in the password and retype the password [ Screenshot ]
- Click Next
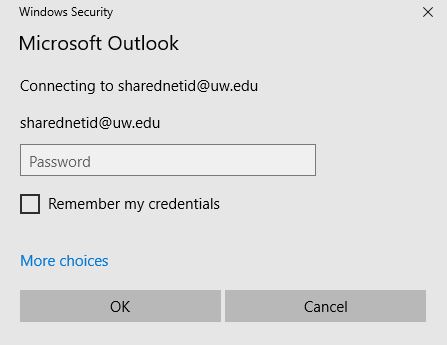
- If a Windows Security window pops up, type in the Shared NetID’s password [ Screenshot ]
- Click OK
- A UW NetID login page will appear, put in the Shared NetID and password
- Click Sign In [ Screenshot ]
- Your email will be added but you must restart Outlook for it to begin downloading the account’s emails
Export & Import Bookmarks on Internet Explorer
Export Bookmarks from IE
- Open Internet Explorer.
- If the menu bar isn’t visible, press the Alt key and the menu bar (with File, Edit, View, etc.) will appear.
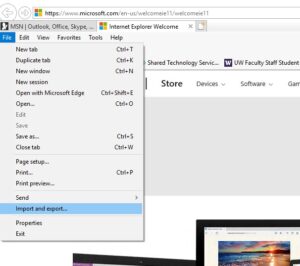
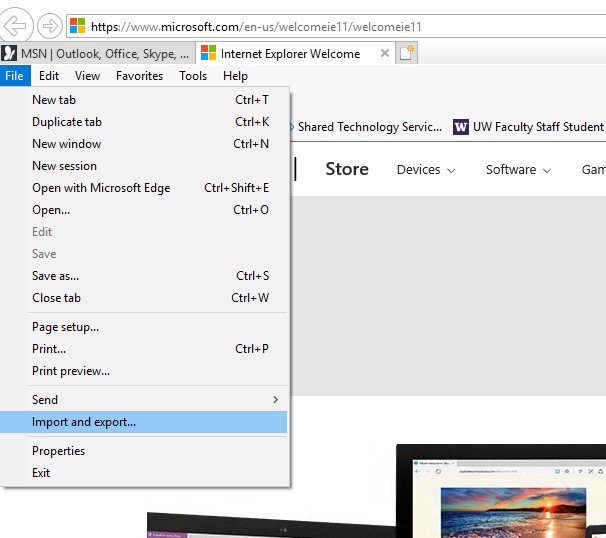
- Click on the File menu and select Import and Export… The Import/Export Settings window will appear.
- In the Import/Export Settings window, click Export to a file. Click Next.
- Select Favorites. Optionally, you may click Cookies to export saved information of your bookmarks – choose the same save location as your bookmarks. Click Next.
- Click the topmost folder labeled Favorites. This will export all bookmarks below the tree. Click Next.
- Make note of the file path of where the file will be exported to. Alternately, you may copy & paste the file path or click Browse to select a location. Click Export.
Import Bookmarks to IE
- Open Internet Explorer.
- If the menu bar isn’t visible, press the Alt key and the menu bar (with File, Edit, View, etc.) will appear.
- Click on the File menu and select Import and Export…. The Import/Export Settings window will appear.
- Click Import from a file. Click Next.
- Select items to import, If you don’t not remember, choose Click Next.
- Locate the bookmark data file. Click Next. (You will also be prompted to locate a text file of your feeds and/or cookies.)
- You may decide to save the destination at the top most location, Favorites. This may create duplicates but can be easily removed by right-clicking on the duplicate and select delete. Click Import.
- Click Finish.