Skip to content

Phishing 101

Is this email legit? Could this email have a virus?

Everyone at the University can be a target of phishing email. These emails look like they come from friends, family, and co-workers from across the aisle to across campus. These emails can also infect your computer and/or steal valuable personal or business information.

Most importantly, if you are even remotely suspicious that something you have received may not be legitimate, do not open it and please let us know right away.

Identifying Phishing Emails

With the often convincing tone or content of a possible phishing email, how can each of us recognize a phishing attempt before it’s too late?

To get a quick introduction to Phishing emails, and learn what you can do to not be ‘hooked’ by one, please review the Phishing 101 – PowerPoint presentation.

Report Spam Using Outlook Quick Steps

Configure Quick Step to Forward Spam to UW IT as an Attachment

  1. From within Outlook, on the Home tab, click Create New in Quick Steps
  2. Outlook Toolbar Quick Steps

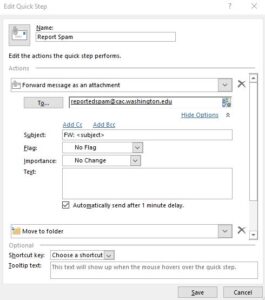
  3. Add a Name – Report Spam
  4. Click the dropdown that says Choose an Action
  5. Select Forward message as an attachment
  6. In the To field, paste reportedspam@cac.washington.edu
  7. Click Show Options
  8. Check the box next to Automatically Send after a 1 min delay
  9. Outlook Quick Step Edit

  10. Click Add Action button
  11. Click the dropdown that says Choose an Action
  12. Select Move to Folder
  13. Click Choose Folder dropdown
  14. Click Other Folder…
  15. Click Junk Email
  16. Click OK
  17. Choose a keyboard shortcut if desired
  18. Add text to show up when you hover over the quick step if you would like, such as “Forward spam to UW IT
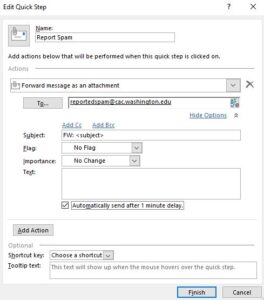
  19. Outlook Quick Step Report Spam

  20. Click Finish
  21. Now click a spam email in your box then click on your new Report Spam button in the Quick Steps section to report it to UW IT.

Configure UW Spam Filter

Turn off junk mail filter in Outlook

  1. Open Outlook
  2. In the main menu, within the Home section, click on the Junk submenu [ Screenshot ]
  3. Click Junk E-mail Options at the bottom of the dropdown menu
  4. In the Options tab, select No Automatic Filtering
  5. In the Safe Senders and Blocked Senders tabs, clear the list by selecting all entries (Click the first entry, then hold shift on your keyboard and click the last entry) then clicking Remove
  6. In the International tab, click each button, click Clear All, and then click OK
  7. Click OK

Configure the new filter in the Outlook Web App

Outlook Configuration OWA
  1. In a browser, go to Outlook on OWA
  2. Make sure the “Try the New Outlook” toggle is disabled. If not, click it to toggle to off as shown in this figure [ Screenshot ]
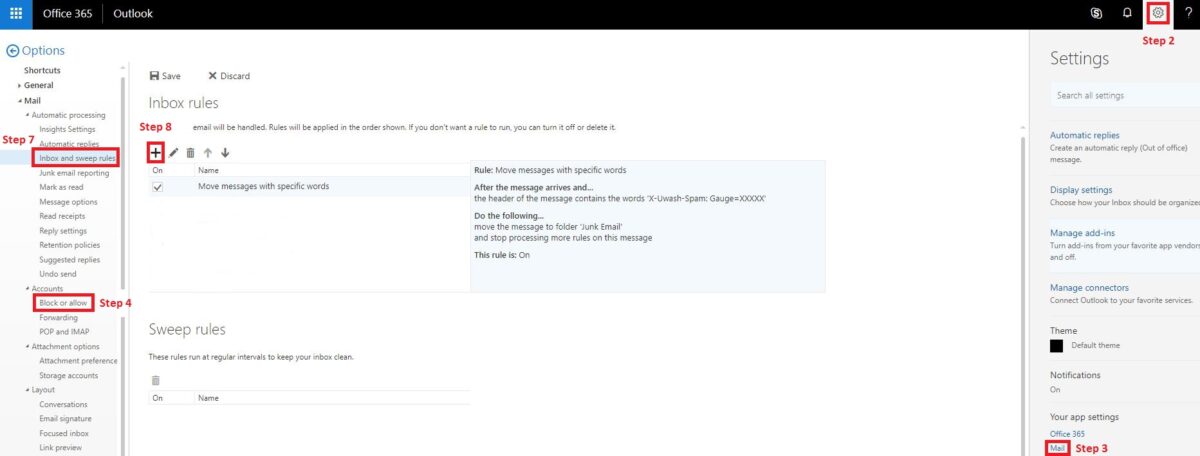
  3. In the main menu, click the gear icon
  4. Click Mail near the bottom of the Settings menu that appears
  5. On the left side of the screen, under Mail > Accounts, click Block or allow
  6. Select Don’t move email to my Junk Email folder [ Screenshot ]
  7. Click Save
  8. Under Mail > Automatic processing, click Inbox and sweep rules
  9. Click the (plus) + symbol
  10. Input a name in the Name field, such as “Spam Filter” [ Screenshot ]
  11. Click the dropdown menu under When the message arrives, and, click It includes these words, then in the message header [ Screenshot ]
  12. Copy the text: X-Uwash-Spam: Gauge=XXXXXX
    (Note: how strict the spam filter is depends on how many X’s are in the bold text above. Less X’s means the filter is more strict, more X’s means less strict. You can find more information and modify this later by following the “Modify Outlook Web App Spam Filter” document)
  13. In the Specify words or phrases box where it says “Enter words…” paste the text you copied, click the (plus) + symbol, then click OK [ Screenshot ]
  14. Under Do the following click the dropdown box and select Move, copy or delete then Move the message to folder…
  15. In the Select Folder window, select Junk E-Mail and click OK
  16. Make sure the Stop processing more rules box at the bottom is checked
  17. Click the OK button at the top to save
  18. If a “warning” box appears, click OK