The following instructions help update the display name for a personal or shared UWNetID. Display names are visible, for instance, when someone receives an email from you or looks you up in the address book. Changes to UWNetID may take an overnight update to take effect.
Individual NetID
- Go to Identity.UW services website.
- In the Profile Information tab, click the Edit button next to the listing for your Preferred Name
- Update your name as desired
- Click Agree & Save Name
Shared NetID
- Go to Manage UW NetID Resources services website
- Log in with the Shared UW NetID and password
- In the Basic Settings section, the Name: field can be updated by clicking the edit link
- Update the Display Name field
- Click Save
If you are not receiving email to your Outlook account (especially for new employees), you may have your email forwarding set to a personal email or UW G Suite. We recommend UW employees forward their UW email to Office 365. If you are leaving the UW you can forward your email to another email in step 3 below.
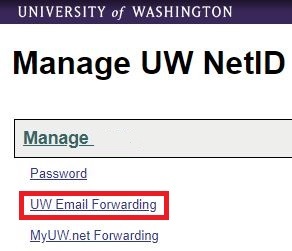
- Go to Manage NetID Resources
- Click on UW Email Forwarding from the menu of services
- Click the radio button next to Forward to UW Office 365
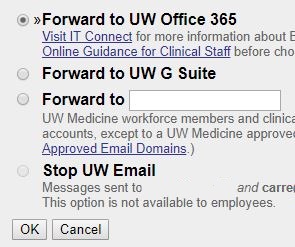
- Click OK
In the event a shared email account is no longer receiving new emails, remove and re-add the account to Outlook to resolve the issue.
- From within Outlook, click on File in the main menu
- Click on Account Settings, then Account Settings again [ Screenshot ]
- Select the shared email address and click Remove
- Click Yes if prompted whether you want to continue
- Once the account has been removed, click New [ Screenshot ]
- In the Name field, put the Shared NetID
- In the Email field, put in the shared email address
- Type in the password and retype the password [ Screenshot ]
- Click Next
- If a Windows Security window pops up, type in the Shared NetID’s password [ Screenshot ]
- Click OK
- A UW NetID login page will appear, put in the Shared NetID and password
- Click Sign In [ Screenshot ]
- Your email will be added but you must restart Outlook for it to begin downloading the account’s emails
Outlook Web App (OWA) is an online interface you can use to access your UW email and calendar from anywhere. Your desktop Outlook and the Outlook Web App are synced, so you don’t have to worry about missing emails or transferring anything between the two. While it does not have all the functionality of the desktop application form of Outlook, it is a handy resource to use when you are remote or on the go.
- Go to Outlook OWA for UW
- Type in your @uw.edu email (example@uw.edu)
- Click Next
- A message appears: Taking you to your organization’s sign-on page
- A UW NetID login page will come up – sign in with your UW NetID and password
- After you sign in you will be redirected to the Outlook Web App

In Outlook, click on the calendar icon in the taskbar, then follow the instructions for the corresponding action: Share a Calendar | Modify Calendar Permissions | Open a Calendar [ Screenshot ]
Share a Calendar
- Click on the calendar you would like to share from the sidebar menu – your personal calendar is under My Calendars as Calendar
- Click Share Calendar from the main menu within the Home tab of Outlook
- Type in the email address of the person you would like to share your calendar with or click the To… button to search for them [ Screenshot ]
- If you’d like access to their calendar, check the box next to Request permission to view recipient’s Calendar
- Check the box next to Allow recipient to view your Calendar
- Click the drop-down box next to Details and select one of the three options, described below:
- Availability only: Shows details like “Free” and “Busy”
- Limited details: Shows availability and the subject of calendar items
- Full details: Shows availability and all details of calendar items
- Click Send
- The recipient will then receive an email from you – they only need to open the email and click on Open this Calendar to view your calendar [ Screenshot ]
Modify Calendar Permissions
- Click on the calendar you would like to set permissions for from the sidebar menu – your personal calendar is under My Calendars as Calendar
- Click on Calendar Permissions in the toolbar in the Home tab in Outlook
- Find the person whose permissions you would like to edit and click their name
- Below, you can either give custom permissions or select preset permission settings from the drop-down menu next to Permission Level – you can check what accesses different presets give by selecting them and seeing how they change the four categories of Read, Write, Delete items, and Other [ Screenshot ]
- Click OK
Open a Calendar
- Click on the Open Calendar icon on the toolbar at the top of the Outlook window
- Click From Address Book
- Type in the name of the person whose calendar you would like to access and press Enter on your keyboard
- Double click their name
- Click OK
Open the People screen by clicking on the People icon in the taskbar. [ Screenshot ]
Share all your Outlook contacts
- In the main menu make sure Contacts is selected [ Screenshot ]
- Continue to Sharing and Opening Contacts
Share Specific Contacts
- In the My Contacts menu, right-click on Contacts and select New Folder [ Screenshot ]
- Give the folder a name and click OK
- Click on the new folder you have created
- Continue to Share and Open Contacts
Share and Open Contacts
- Click on Share Contacts in main menu [ Screenshot ]
- Enter the email of the person you want to share your contacts with or click To… to search for them
- Check to box next to Recipient can add, edit and delete items in this contact folder if you would like them to have that ability
- Click Send
- The recipient will then double click the email they receive &
- Click Open this Contacts folder in the menu
- To send an email to the contacts or group, open a new message
- Click Address Book in the menu
- Click the drop-down menu to choose the shared folder, select the contacts or groups to send to and click OK [ Screenshot ]
A Mailman distribution list can be used to send an email to a group of people large or small by sending an email to one address. They are requested from and managed by UW IT.
Request: Fill out and submit this Standard Mailman List Request form [NetID required] to create a UW Mailman distribution list.
Management: Review the Owners and Moderators Guide to get more information about how to manage a distribution list.
Administration: Use this shortcut to your list’s admin page – https://mailman.u.washington.edu/mailman/admin/listname/
Subscribers: UW-IT provides additional information about subscribing to and accessing distribution lists.
Delete: Fill out and submit this Mailman Delete Request form [NetID required] to delete a UW Mailman distribution list.
When you log in to a computer for the first time, you’ll need to set up your email on Outlook. Thankfully it only takes a minute!
- Click the Start button in the lower left-hand corner of your screen
- Type “Outlook”
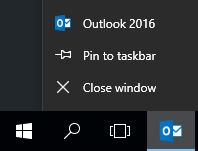
- Click on “Outlook 2016″
- Optional: An Outlook icon will appear on your taskbar – to pin it there, right-click on the icon and select Pin to taskbar
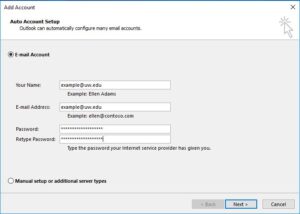
- If you are on the UW NetID domain, Outlook will automatically grab your name and email. Otherwise, type in your name, your email, and your password and click Next
- Outlook will then connect to the account, at which point a Windows Security window will pop up asking for your credentials – input your UW NetID password and click OK
- If successful, you will receive the message “Congratulations! Your email account was successfully configured and is ready to use” – click Finish
It will take a couple of minutes or longer depending on the size of your email account to download your emails.
Troubleshooting
- Double-check your password – you can try logging into MyUW to make sure your NetID and password are working. If you cannot log into MyUW, try resetting your password or calling UW IT at 206-221-5000 for password assistance.
- Make sure you are putting your full @uw.edu email address.
- In the event that Outlook is set up but are not receiving any emails, follow the steps to Change UW Email Forwarding to make sure your email is forwarded correctly.


